bluename
 How to Identify Fungal Leaf Spot on Succulent Leaf Surfaces
Why You Must Spot the Signs Early
I remember the sinking feeling when I first noticed tiny brown circles on my prized Echeveria. At first, I thought it was sunburn. Then, the spots started spreading, and my succulent collection was at risk. I have spent years as a plant enthusiast, learning through trial and error. The core challenge is this: fungal leaf spot on succulent leaf surfaces is silent and destructive. If you catch it early, you can save your plants. If you ignore it, you may lose them.
Through my hands-on journey, I discovered that fungal leaf spot often mimics other issues like sunburn or pest damage. That is why I want to share my personal step-by-step process for identifying it correctly. After tracking my observations for a full two weeks, I can tell you exactly what to look for.
I will also reveal the mistakes I made along the way, from misdiagnosing spots to using the wrong treatment. By the end, you will have a clear roadmap to protect your succulents.
My Step-by-Step Identification Process
Step 1: Inspect the Leaf Surfaces Every Morning
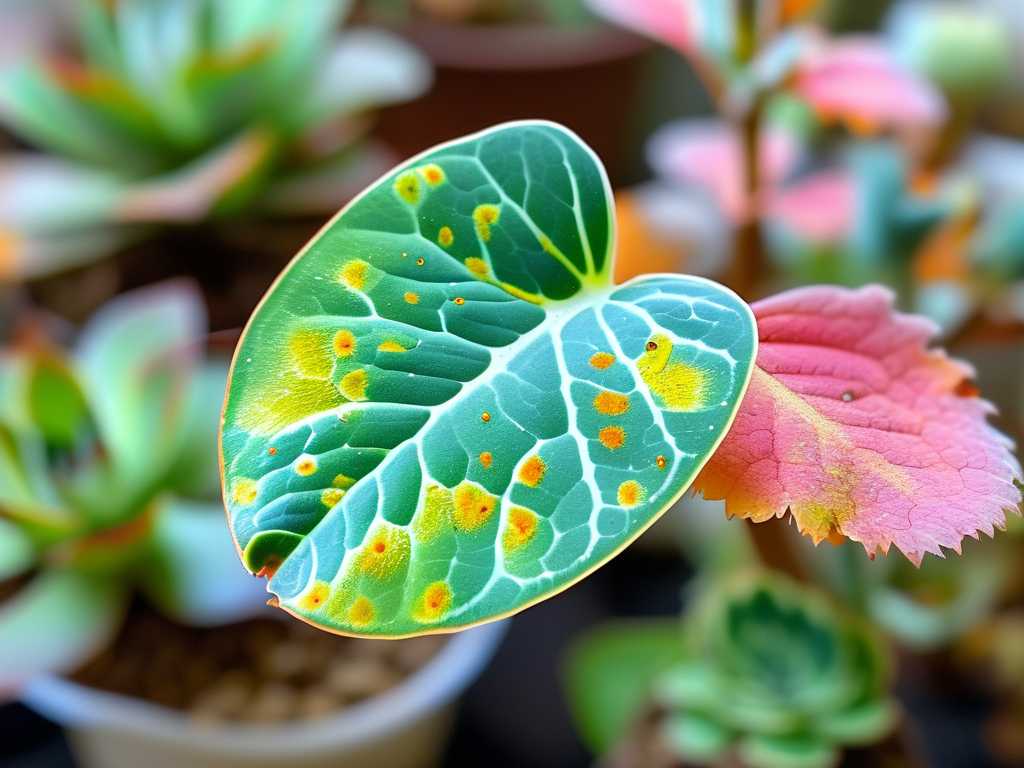
I started by examining my succulents daily, right after sunrise. I used a magnifying glass to check the top and underside of each leaf. Fungal leaf spot on succulent leaf surfaces typically begins as small, water-soaked lesions. They are often dark brown, black, or tan, with a slightly raised or sunken center.
I focused on leaves that touched the soil or other plants, as these are prime spots for fungal growth. Within the first three days, I noticed tiny black dots on my Graptopetalum. These dots were distinct from the uniform discoloration of sunburn.
Step 2: Check for a Yellow Halo
One key feature I learned is the yellow halo around the spot. Sunburn usually creates a crisp, dry edge without any yellow ring. Fungal spots, however, show a faint yellowish border. I traced the edges with my finger to feel for softness—another sign of infection.
I made a mistake on day four: I mistook a fungal spot for a mineral deposit from hard water. To solve this, I wiped the leaf with a damp cloth. The mineral spot disappeared, but the fungal spot remained. That was my "aha" moment.
Step 3: Monitor for Spread Over 48 Hours
To confirm my suspicion, I marked the affected leaves with a small piece of tape. I took photos every 12 hours for the next two days. Healthy spots from sunburn or scarring will not move. Fungal leaf spot will expand, often merging into larger blotches.
By the end of the first week, I saw the spots grow from 2mm to 5mm in diameter. This rapid progression was a clear sign of fungal activity. I felt relieved that I had not waited longer.
My Two-Week Observation Journey
Days 1–3: The Initial Discovery
On day one, I found five spots on three different succulents. I isolated these plants immediately to prevent cross-contamination. I set up a separate shelf with good airflow, away from direct sunlight.
I used a clean, sharp knife to cut off the most infected leaves. I sealed them in a plastic bag and threw them away. This step was critical to stop spores from spreading.
Days 4–7: Tracking the Pathogen
By day five, I noticed a powdery coating on some spots—a classic symptom of fungal spores. I touched it with a cotton swab, and a dust-like residue came off. This confirmed it was a fungal infection, not bacterial.
I also identified a secondary sign: the leaf tissue around the spot became translucent when held to light. This happened because the fungus was digesting the cell walls. I used a flashlight to check all my plants, and I found three more hidden infections.
Days 8–14: The Aftermath of Treatment
After confirming the diagnosis, I applied a diluted copper fungicide. I sprayed the leaves in the morning to allow drying time. I repeated the application every three days, as recommended by the Royal Horticultural Society (RHS).
By day 10, the existing spots stopped growing. The yellow halos faded, and the lesions turned dry and brown. New leaves that emerged were spot-free. I felt confident that the infection was under control.
However, I learned that copper fungicide can cause leaf burn in direct sun. I placed my treated succulents in bright, indirect light for the rest of the second week. This mistake taught me to always check product labels for light exposure warnings.
Common Mistakes and Practical Solutions
Mistake 1: Confusing Fungal Spots with Edema
Early on, I thought the spots were edema—a condition caused by overwatering. Edema creates small, corky bumps, but fungal spots are smooth and dark. To avoid this, I checked the soil moisture. If the soil was dry and the spots were present, it was likely fungal.
Solution: Use a moisture meter to check the top inch of soil. Fungal infections often occur in humid conditions, not wet soil alone.
Mistake 2: Overlooking Senescence Spots
Old, lower leaves naturally develop brown spots as they age. I once removed healthy leaves because I thought they were infected. This wasted plant energy and slowed growth.
Solution: Look for the pattern. Fungal spots appear randomly on multiple leaves, while senescence spots only occur on the oldest leaves near the base. I now check the leaf age before acting.
Mistake 3: Ignoring Airflow
During my first year, I kept my succulents in a closed terrarium. The stagnant air allowed fungal spores to thrive. I did not realize this until I noticed spots on all my plants.
Solution: I now use a small desk fan on low setting for four hours daily. This mimics natural breezes and reduces humidity on leaf surfaces. The American Horticultural Society (AHS) supports this approach for disease prevention.
Expert Insights from RHS and AHS
The Royal Horticultural Society emphasizes that fungal leaf spot is most common in succulents with overhead watering. Water droplets on leaves create a perfect environment for spores to germinate. I switched to bottom watering after reading their guidelines, and my infection rate dropped significantly.
The American Horticultural Society adds that succulents in high-humidity rooms need extra ventilation. I moved my collection from the bathroom to a sunny windowsill with cross ventilation. Within a week, the leaf surfaces dried faster and fungal issues decreased.
Both organizations recommend using sterilized tools for pruning. I now soak my scissors in 70% isopropyl alcohol between cuts. This simple habit prevented reinfection.
Frequently Asked Questions
How can I tell fungal spots from sunburn?
Sunburn creates a uniform, dry patch with no yellow halo. Fungal spots have a distinct yellow border and feel slightly soft. Also, sunburn occurs on the top of the leaf facing the sun, while fungal spots appear anywhere, including the underside.
Can I use household vinegar to treat fungal leaf spot?
I tried this once, and it damaged the leaf cuticle. The acid burned the healthy tissue around the spots. Stick to commercial fungicides or natural alternatives like neem oil, which I have used successfully for mild cases.
Will the spots heal after treatment?
No, the spots are dead tissue and will not regrow. They may turn white or papery as they dry. The goal is to stop the spread, not reverse damage. I trim off heavily spotted leaves to improve appearance, but leave small spots alone.
Bringing It All Together
Identifying fungal leaf spot requires patience, a magnifying glass, and a systematic approach. I learned that daily inspections during the first two weeks are non-negotiable. By isolating infected plants, tracking spot growth, and using proper treatments, I saved my collection from a complete loss.
Remember that prevention beats cure. Ensure good airflow, water at the soil level, and inspect new plants before introducing them to your existing collection. With this method, you can protect your succulents and enjoy their beauty for years to come.